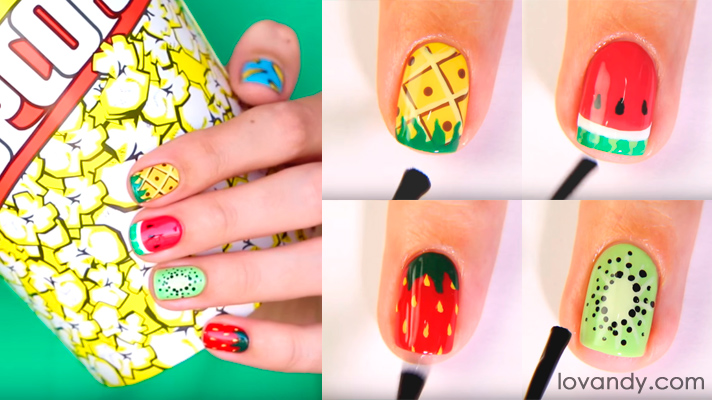
Do you want your manicure to look funny and vivid? Then here you can find out how to make summer fruit nails, which will fulfill both of these desires.
This tutorial will be rather long, so make sure you have all things mentioned in the list below. It is ok to paint your nails with just one of variants. However, in this list, there is stuff you will need for the whole summer nails manicure.
Therefore, you will need:
- Some base nail coat;
- Yellow, brown, light yellow and green nail polishes for pineapple nail art design;
- Red (or crimson red), green, light green, white and black polishes for watermelons;
- Light green, white (or lighter green) and black nail polishes for kiwi nails;
- Red, yellow and rifle-green polishes for strawberry nails art;
- Thin nail brush for details;
- Toothpick or bobby pin for drawing dots on your nails (also, you may use professional instruments if you have some);
- Top nail coat for holding;
- Acetone and cotton buds for any sort of corrections.

As you can see on the photo, combining all of these summer holiday nails ideas into a single manicure looks kind of cool and rather beautiful. Nevertheless, every single nail is outstanding itself. Meaning, you may use some other combinations. It may depend on your appearance, make up and clothing.

This is a fruit nails design we are going to acquire. However, for your convenience, we divided our tutorial on subthemes, so that you could easily jump wherever you need. This way you can paint your nails only with those pictures you need and skip another.
How To Do Pineapple Nails

At first, use some base nail coat to protect the nail and make painting much easier. If you skip this step, your manicure will not last long enough and may fall off. So, we strongly advise you to do it.

Now take the yellow polish that you have selected and paint your nail with it. It is better to make it in two layers, so that the background will not fade. Make sure the whole nail is fully covered with the color.

Then grab your thin nail brush and paint these strips with the brown polish. Some patience and precision will help you do the thing. Do not make it too thick, as we will add another one soon.

Use a toothpick or a bobby pin for this step. Drawing these dots can make your pineapple look more natural and will surely diversify the whole picture.

To make summer pineapple nails more volumetric and realistic, paint strips again with your light yellow nail polish. Use a thin brush. It is ok if you cover brown strips, but be careful and do not use too much polish.

Now paint some leaves with the green polish to finish the picture. This time it is not bad if you use too much polish.

Cover your pineapple with a top coat. Now you are done with pineapple nail tutorial. Let us move on to the next one.

How To Do a Watermelon Nails Design

After painting the nail with a base coat, cover it twice with the crimson red nail polish. Also, you may use dark pink polish. Just do it as you like it.

Now, start the watermelon nail designs by drawing the crust of a berry with the green polish. It is better to perform it by placing your brush parallel with the growth of the nail, because this way the polish will not flow too far.

Drawing these wavy strips can help you imitate the pattern of a real watermelon. Do it only when the basic green strip has dried.

Draw a nice white line between green and red polishes. Then use your thin nail brush to paint some seeds, which will make these cute watermelon nail design look finished. Also, it would be good to practice in seeds painting on some piece of paper before you begin.

Cover the nail with a top coat and jump forward to the next tutorial.

How To Make Kiwi Nails Art

As we have done before, put a base nail coat on your nail, and then cover it with a double layer of light green polish.

Now use a lighter green polish (white color would also be fine) and a thin brush to draw this pattern. It is not as hard as it may seem. Just paint one ellipse in the center and complement it with strips, just as if you were drawing sun.

Use your toothpick or pin to make these dots with the black nail polish. It is better to draw bigger ones closer to the center. If you lack inspiration, use some kiwi photos for help.

Make sure that dots are smooth and round. Then cover your kiwi nail with a top coat to finish this kiwi nails tutorial.

How To Do Strawberry Nails Design

Put your base nail coat on the nail, and then cover it with the red polish twice. We advise you to use brighter color, comparing to the one you have used for the watermelon nail.

After the red polish has dried nicely, use a thin nail brush to draw seeds with the yellow one. The technique is quite similar to the one we used for watermelons.

Draw some leaves, using the green nail polish. Some rifle-green fits best for this. You would better pick some different color from the one we used on watermelon nails.

Cover the nail with a top coat to finish strawberry nails tutorial.

So, here are your cool summer nails. As you can see, the result is fabulous. Use some different combinations to find out how you like it more. If you want to, use a matte top coat. This might change the look of the entire manicure.

By the way, you might paint your thumb nails with some bananas. If you want to, visit our banana nails tutorial. To sum up, all this fruit manicure is really an interesting one. It does not require any specials skills or materials from you. All you need is some time and a bit of imagination.

Such nails look beautiful with any colorful dress. In addition, you may use this manicure for various situations, whether it is just another workday or some cool celebration.
Source of pictures: youtube.com